


Master the new OpenAI Agent Builder
If You need an Agent but no AI-powered Business…
This is fantastic for business owners that want to get rid of Freelancers fees, costly Zapier integrations and pseudo affordable n8n agents you need to have ChatGPT or any other LLM costly subscription. When you need a gadget-widget to help you be more productive yourself with no coding knowledge to “explore” what you can do with AI and build non-integrated workflows/business processes to mimic human organization at work : This is for you – The Essentials Of OpenAI Agent Builder – ( we added audio ).
For the sake of Quick creation without the strategy beforehand…
OpenAI Agent Builder enables quick creation of AI agents tailored to specific tasks, delivering immediate benefits like faster automation, improved customer interactions, and enhanced productivity. By allowing businesses and developers to design customizable AI assistants, it streamlines workflows and reduces manual effort right away. In the long term, this technology can transform industries by driving smarter decision-making, fostering innovation, and enabling scalable AI integration across diverse sectors. Ultimately, it paves the way for more efficient, adaptive, and personalized digital experiences.
OpenAI Agent Kit (The free Course that will make you and instant Wizard)
-
Agent Builder
-
ChatKit
-
Advanced integrations with ChatKit
Agent Builder
=============
Visually assemble, debug, and export multi-step agent workflows from the playground.
**Agent Builder** is a visual canvas for building multi-step agent workflows.
You can start from templates, drag and drop nodes for each step in your workflow, provide typed inputs and outputs, and preview runs using live data. When you're ready to deploy, embed the workflow into your site with ChatKit, or download the SDK code to run it yourself.
Use this guide to learn the process and parts of building agents.
Agents and workflows
--------------------
To build useful agents, you create workflows for them. A **workflow** is a combination of agents, tools, and control-flow logic. A workflow encapsulates all steps and actions involved in handling your tasks or powering your chats, with working code you can deploy when you're ready.
[Open Agent Builder](/agent-builder)
There are three main steps in building agents to handle tasks:
1. Design a workflow in [Agent Builder](/agent-builder). This defines your agents and how they'll work.
2. Publish your workflow. It's an object with an ID and versioning.
3. Deploy your workflow. Pass the ID into your [ChatKit](/docs/guides/chatkit) integration, or download the Agents SDK code to deploy your workflow yourself.
Compose with nodes
------------------
In Agent Builder, insert and connect nodes to create your workflow. Each connection between nodes becomes a typed edge. Click a node to configure its inputs and outputs, observe the data contract between steps, and ensure downstream nodes receive the properties they expect.
### Examples and templates
Agent Builder provides templates for common workflow patterns. Start with a template to see how nodes work together, or start from scratch.
Here's a homework helper workflow. It uses agents to take questions, reframe them for better answers, route them to other specialized agents, and return an answer.
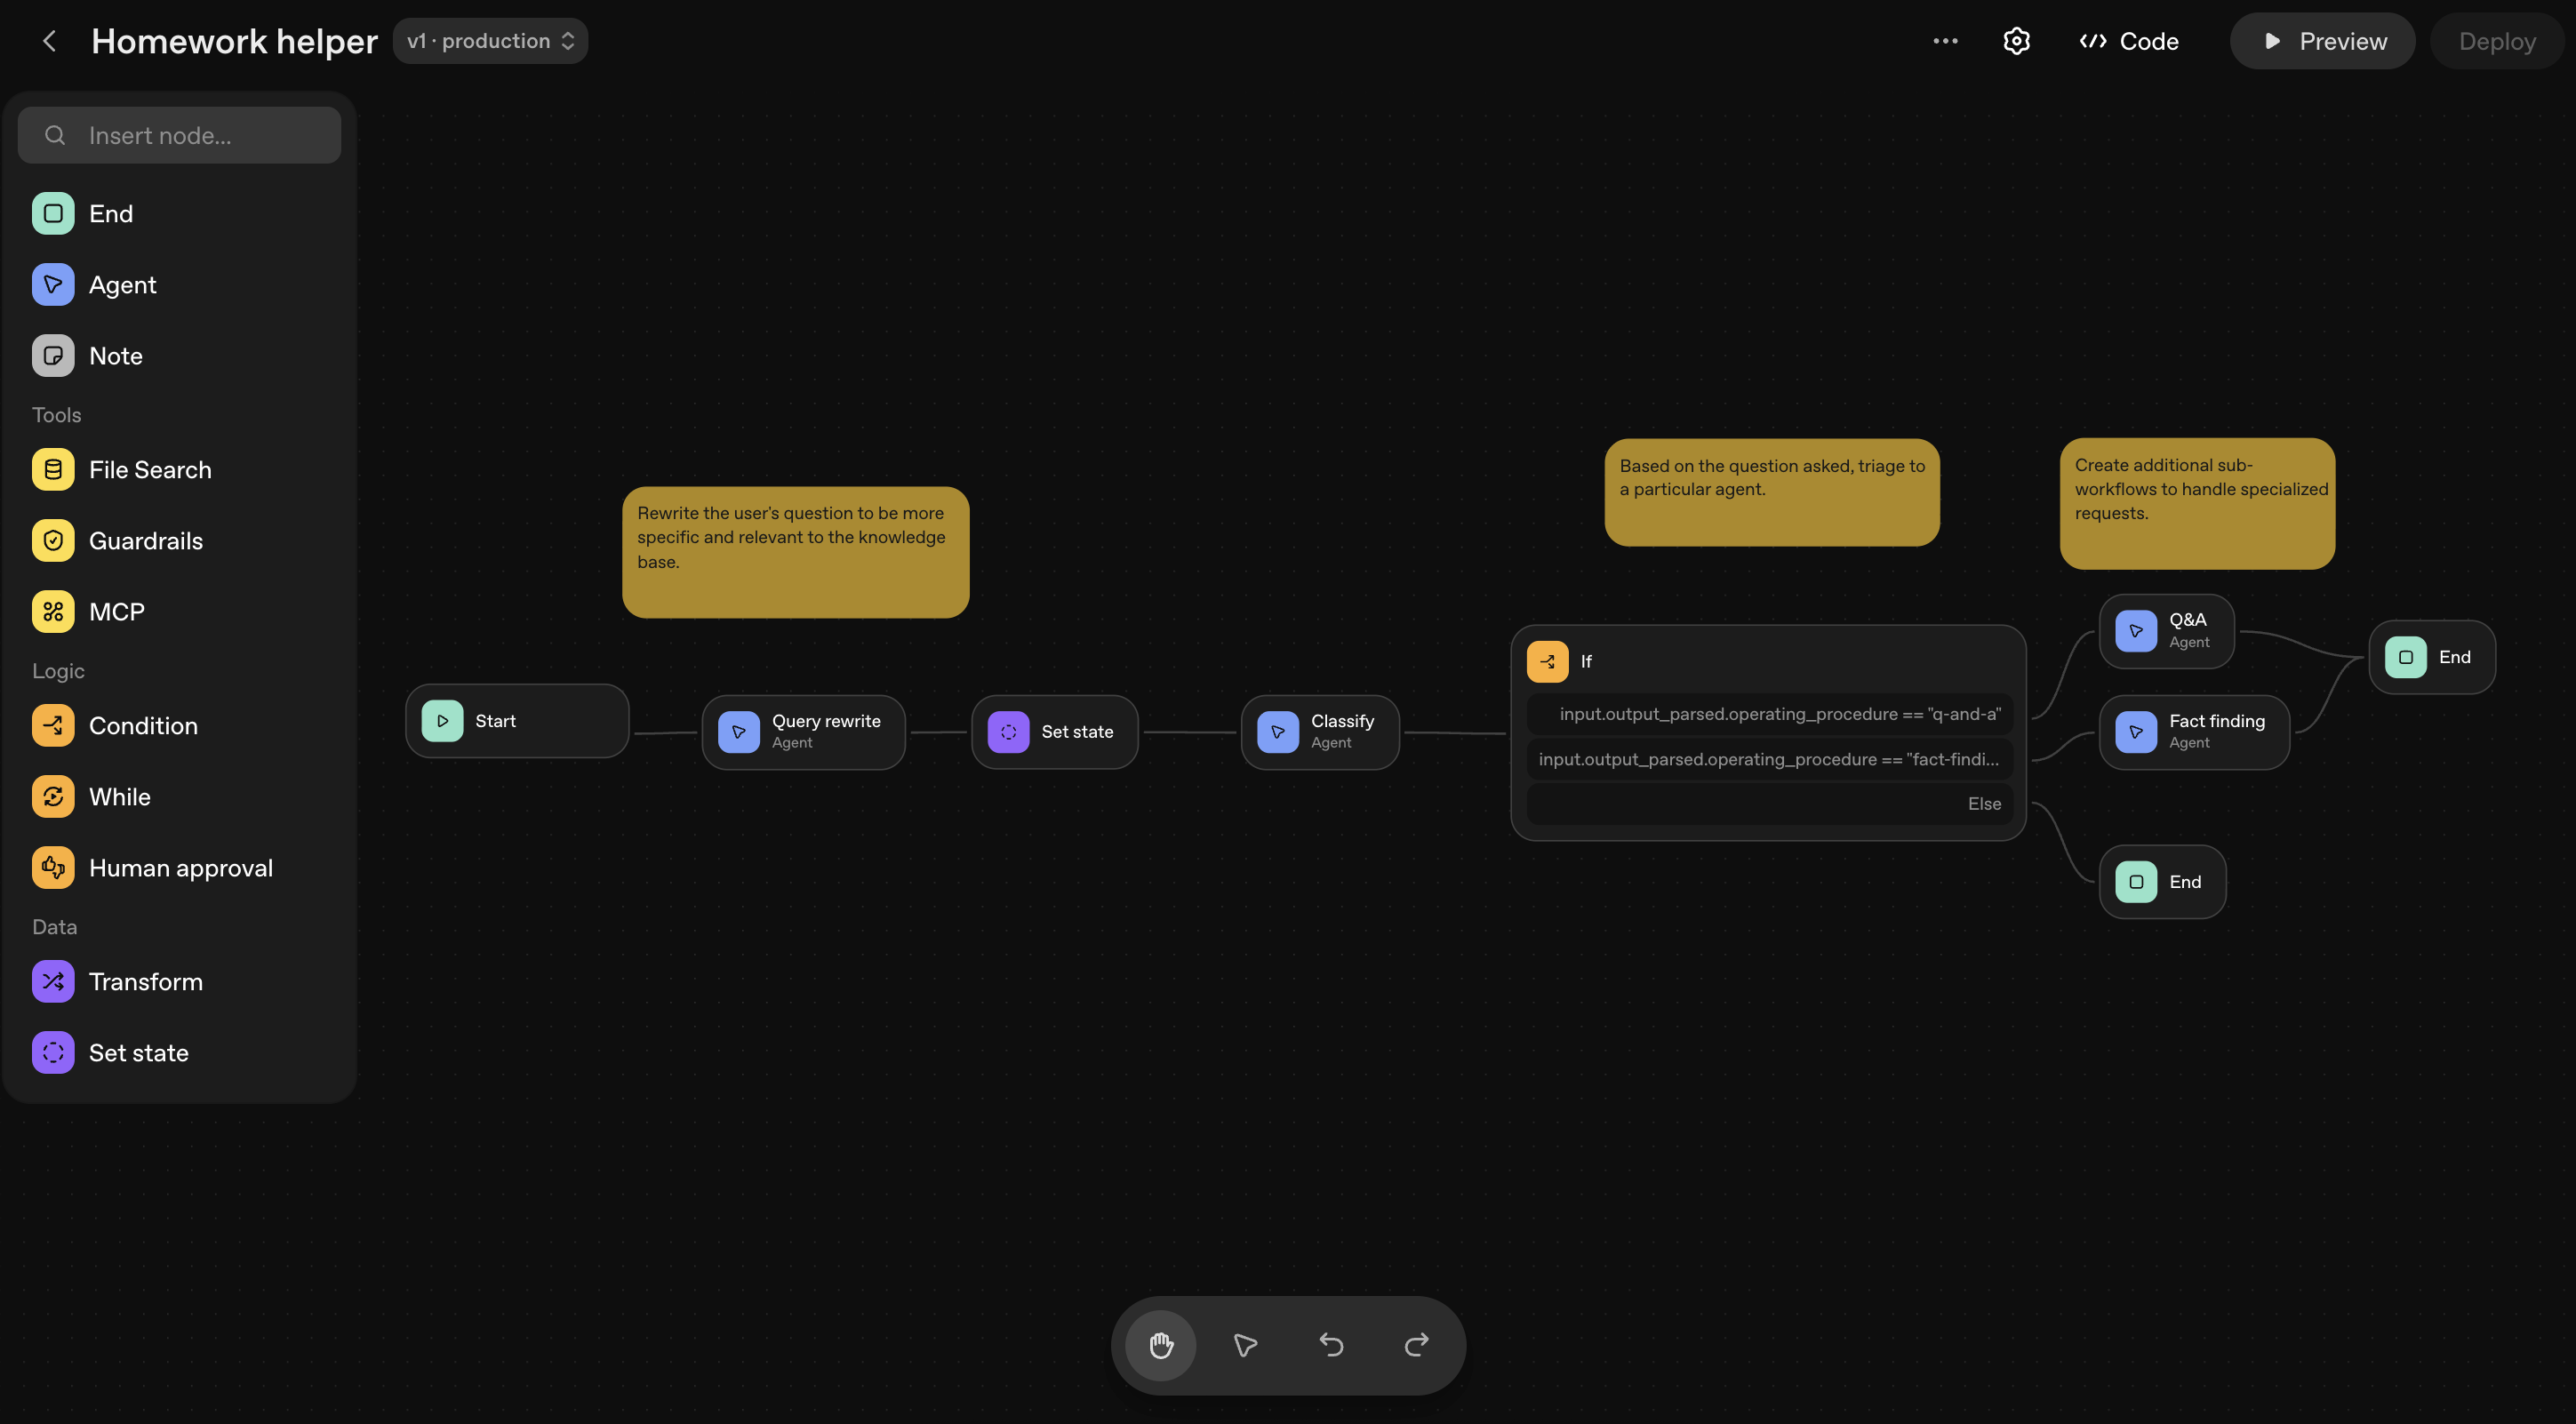

### Available nodes
Nodes are the building blocks for agents. To see all available nodes and their configuration options, see the [node reference documentation](/docs/guides/node-reference).
### Preview and debug
As you build, you can test your workflow by using the **Preview** feature. Here, you can interactively run your workflow, attach sample files, and observe the execution of each node.
### Safety and risks
Building agent workflows comes with risks, like prompt injection and data leakage. See [safety in building agents](/docs/guides/agent-builder-safety) to learn about and help mitigate the risks of agent workflows.
### Evaluate your workflow
Run [trace graders](/docs/guides/trace-grading) inside of Agent Builder. In the top navigation, click **Evaluate**. Here, you can select a trace (or set of traces) and run custom graders to assess overall workflow performance.
Publish your workflow
---------------------
Agent Builder autosaves your work as you go. When you're happy with your workflow, publish it to create a new major version that acts as a snapshot. You can then use your workflow in [ChatKit](/docs/guides/chatkit), an OpenAI framework for embedding chat experiences.
You can create new versions or specify an older version in your API calls.
Deploy in your product
----------------------
When you're ready to implement the agent workflow you created, click **Code** in the top navigation. You have two options for implementing your workflow in production:
**ChatKit**: Follow the [ChatKit quickstart](/docs/guides/chatkit) and pass in your workflow ID to embed this workflow into your application. If you're not sure, we recommend this option.
**Advanced integration**: Copy the workflow code and use it anywhere. You can run ChatKit on your own infrastructure and use the Agents SDK to build and customize agent chat experiences.
Next steps
----------
Now that you've created an agent workflow, bring it into your product with ChatKit.
* [ChatKit quickstart](/docs/guides/chatkit) →
* [Advanced integration](/docs/guides/custom-chatkit) →
ChatKit
=======
Build and customize an embeddable chat with ChatKit.
ChatKit is the best way to build agentic chat experiences. Whether you’re building an internal knowledge base assistant, HR onboarding helper, research companion, shopping or scheduling assistant, troubleshooting bot, financial planning advisor, or support agent, ChatKit provides a customizable chat embed to handle all user experience details.
Use ChatKit's embeddable UI widgets, customizable prompts, tool‑invocation support, file attachments, and chain‑of‑thought visualizations to build agents without reinventing the chat UI.
Overview
--------
There are two ways to implement ChatKit:
* **Recommended integration**. Embed ChatKit in your frontend, customize its look and feel, let OpenAI host and scale the backend from [Agent Builder](/docs/guides/agent-builder). Requires a development server.
* **Advanced integration**. Run ChatKit on your own infrastructure. Use the ChatKit Python SDK and connect to any agentic backend. Use widgets to build the frontend.
Get started with ChatKit
------------------------

[

Embed ChatKit in your frontend
Embed a chat widget, customize its look and feel, and let OpenAI host and scale the backend
](#add-chatkit-to-your-frontend)[


Advanced integration
Use any backend and the ChatKit SDKs to build your own custom ChatKit user experience
](/docs/guides/custom-chatkit)
Embed ChatKit in your frontend
------------------------------
At a high level, setting up ChatKit is a three-step process. Create an agent workflow, hosted on OpenAI servers. Then set up ChatKit and add features to build your chat experience.
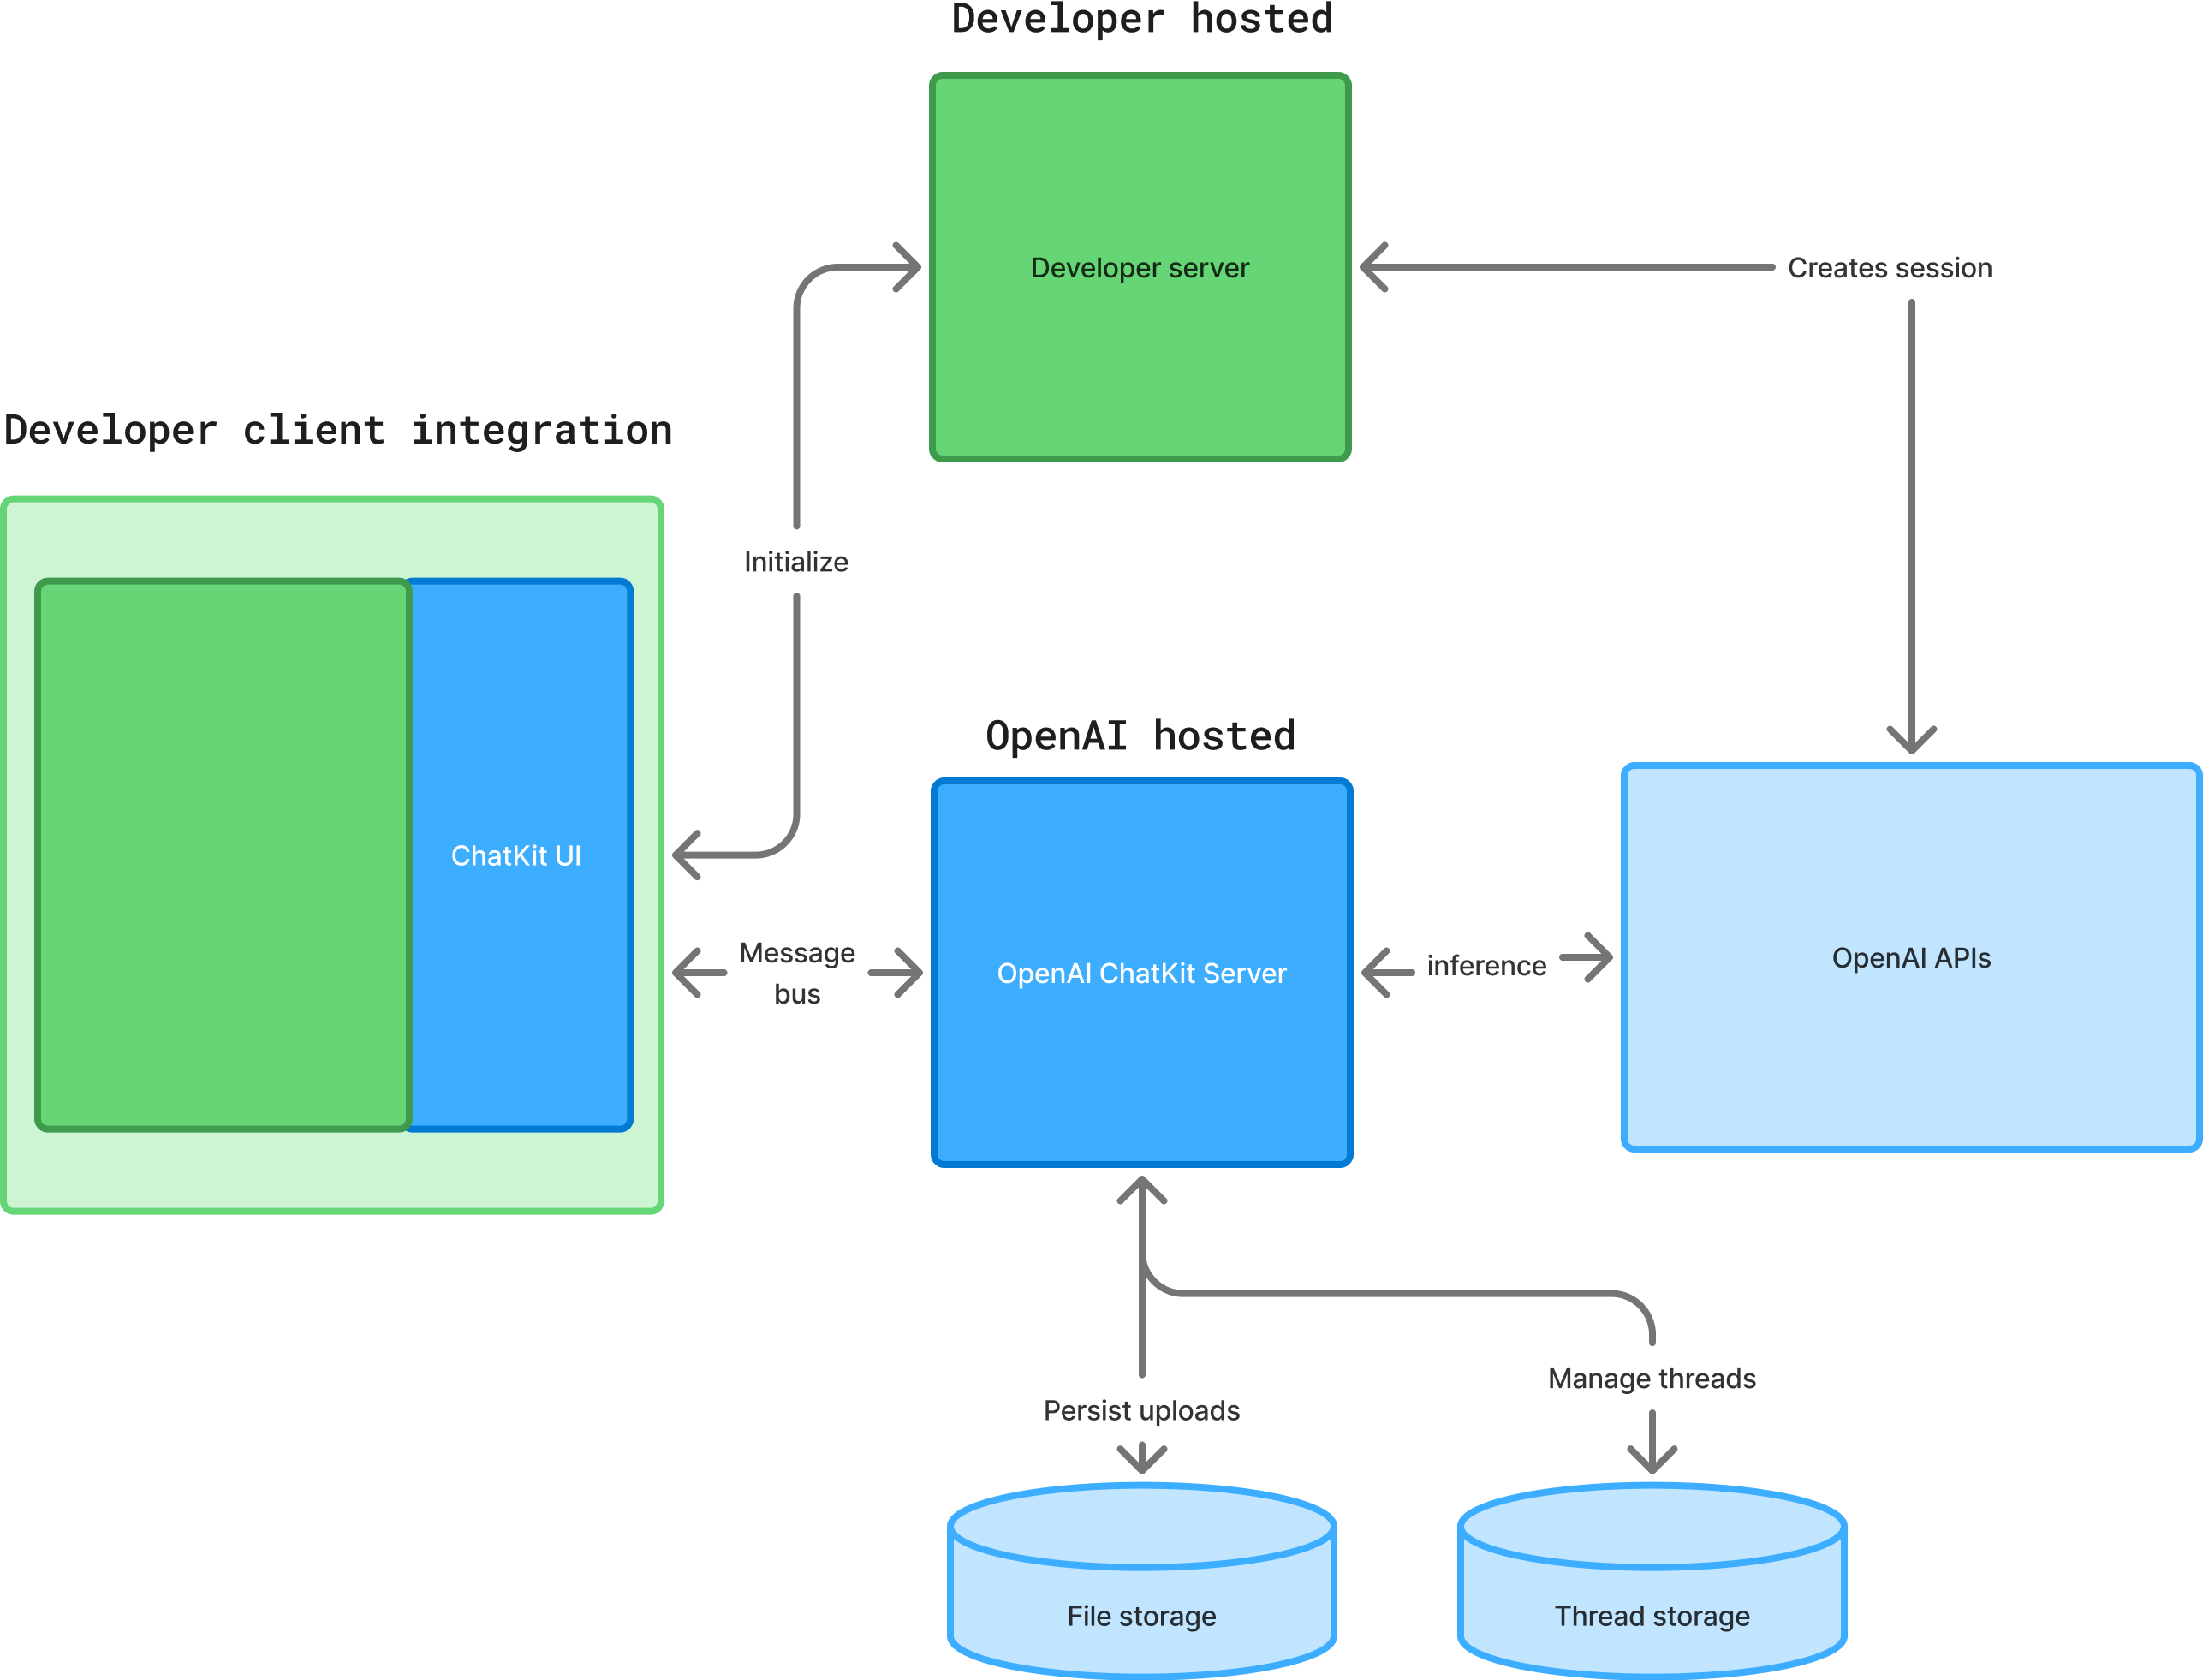

### 1\. Create an agent workflow
Create an agent workflow with [Agent Builder](/docs/guides/agent-builder). Agent Builder is a visual canvas for designing multi-step agent workflows. You'll get a workflow ID.
The chat embedded in your frontend will point to the workflow you created as the backend.
### 2\. Set up ChatKit in your product
To set up ChatKit, you'll create a ChatKit session and create a backend endpoint, pass in your workflow ID, exchange the client secret, add a script to embed ChatKit on your site.
1. On your server, generate a client token.
This snippet spins up a FastAPI service whose sole job is to create a new ChatKit session via the [OpenAI Python SDK](https://github.com/openai/chatkit-python) and hand back the session's client secret:
server.py
```python
from fastapi import FastAPI
from pydantic import BaseModel
from openai import OpenAI
import os
app = FastAPI()
openai = OpenAI(api_key=os.environ["OPENAI_API_KEY"])
@app.post("/api/chatkit/session")
def create_chatkit_session():
session = openai.chatkit.sessions.create({
# ...
})
return { client_secret: session.client_secret }
```
2. In your server-side code, pass in your workflow ID and secret key to the session endpoint.
The client secret is the credential that your ChatKit frontend uses to open or refresh the chat session. You don’t store it; you immediately hand it off to the ChatKit client library.
See the [chatkit-js repo](https://github.com/openai/chatkit-js) on GitHub.
chatkit.ts
```typescript
export default async function getChatKitSessionToken(
deviceId: string
): Promise<string> {
const response = await fetch("https://api.openai.com/v1/chatkit/sessions", {
method: "POST",
headers: {
"Content-Type": "application/json",
"OpenAI-Beta": "chatkit_beta=v1",
Authorization: "Bearer " + process.env.VITE_OPENAI_API_SECRET_KEY,
},
body: JSON.stringify({
workflow: { id: "wf_68df4b13b3588190a09d19288d4610ec0df388c3983f58d1" },
user: deviceId,
}),
});
const { client_secret } = await response.json();
return client_secret;
}
```
3. In your project directory, install the ChatKit React bindings:
```bash
npm install @openai/chatkit-react
```
4. Add the ChatKit JS script to your page. Drop this snippet into your page’s `<head>` or wherever you load scripts, and the browser will fetch and run ChatKit for you.
index.html
```html
<script
src="https://cdn.platform.openai.com/deployments/chatkit/chatkit.js"
async
></script>
```
5. Render ChatKit in your UI. This code fetches the client secret from your server and mounts a live chat widget, connected to your workflow as the backend.
Your frontend code
```react
import { ChatKit, useChatKit } from '@openai/chatkit-react';
export function MyChat() {
const { control } = useChatKit({
api: {
async getClientSecret(existing) {
if (existing) {
// implement session refresh
}
const res = await fetch('/api/chatkit/session', {
method: 'POST',
headers: {
'Content-Type': 'application/json',
},
});
const { client_secret } = await res.json();
return client_secret;
},
},
});
return <ChatKit control={control} className="h-[600px] w-[320px]" />;
}
```
```javascript
const chatkit = document.getElementById('my-chat');
chatkit.setOptions({
api: {
getClientSecret(currentClientSecret) {
if (!currentClientSecret) {
const res = await fetch('/api/chatkit/start', { method: 'POST' })
const {client_secret} = await res.json();
return client_secret
}
const res = await fetch('/api/chatkit/refresh', {
method: 'POST',
body: JSON.stringify({ currentClientSecret })
headers: {
'Content-Type': 'application/json',
},
});
const {client_secret} = await res.json();
return client_secret
}
},
});
```
### 3\. Build and iterate
See the [custom theming](/docs/guides/chatkit-themes), [widgets](/docs/guides/chatkit-widgets), and [actions](/docs/guides/chatkit-actions) docs to learn more about how ChatKit works. Or explore the following resources to test your chat, iterate on prompts, and add widgets and tools.
#### Build your implementation
[
ChatKit docs on GitHub
Learn to handle authentication, add theming and customization, and more.
](https://openai.github.io/chatkit-python)[
ChatKit Python SDK
Add server-side storage, access control, tools, and other backend functionality.
](https://github.com/openai/chatkit-python)[
ChatKit JS SDK
Check out the ChatKit JS repo.
](https://github.com/openai/chatkit-js)
#### Explore ChatKit UI
[
chatkit.world
Play with an interactive demo of ChatKit.
](https://chatkit.world)[
Widget builder
Browse available widgets.
](https://widgets.chatkit.studio)[
ChatKit playground
Play with an interactive demo to learn by doing.
](https://chatkit.studio/playground)
#### See working examples
[
Samples on GitHub
See working examples of ChatKit and get inspired.
](https://github.com/openai/openai-chatkit-advanced-samples)[
Starter app repo
Clone a repo to start with a fully working template.
](https://github.com/openai/openai-chatkit-starter-app)
Next steps
----------
When you're happy with your ChatKit implementation, learn how to optimize it with [evals](/docs/guides/agent-evals). To run ChatKit on your own infrastructure, see the [advanced integration docs](/docs/guides/custom-chatkit).
Note: Do not forget to pay the subscription and the hidden fees costs - The Know how was free - Not OpenAI
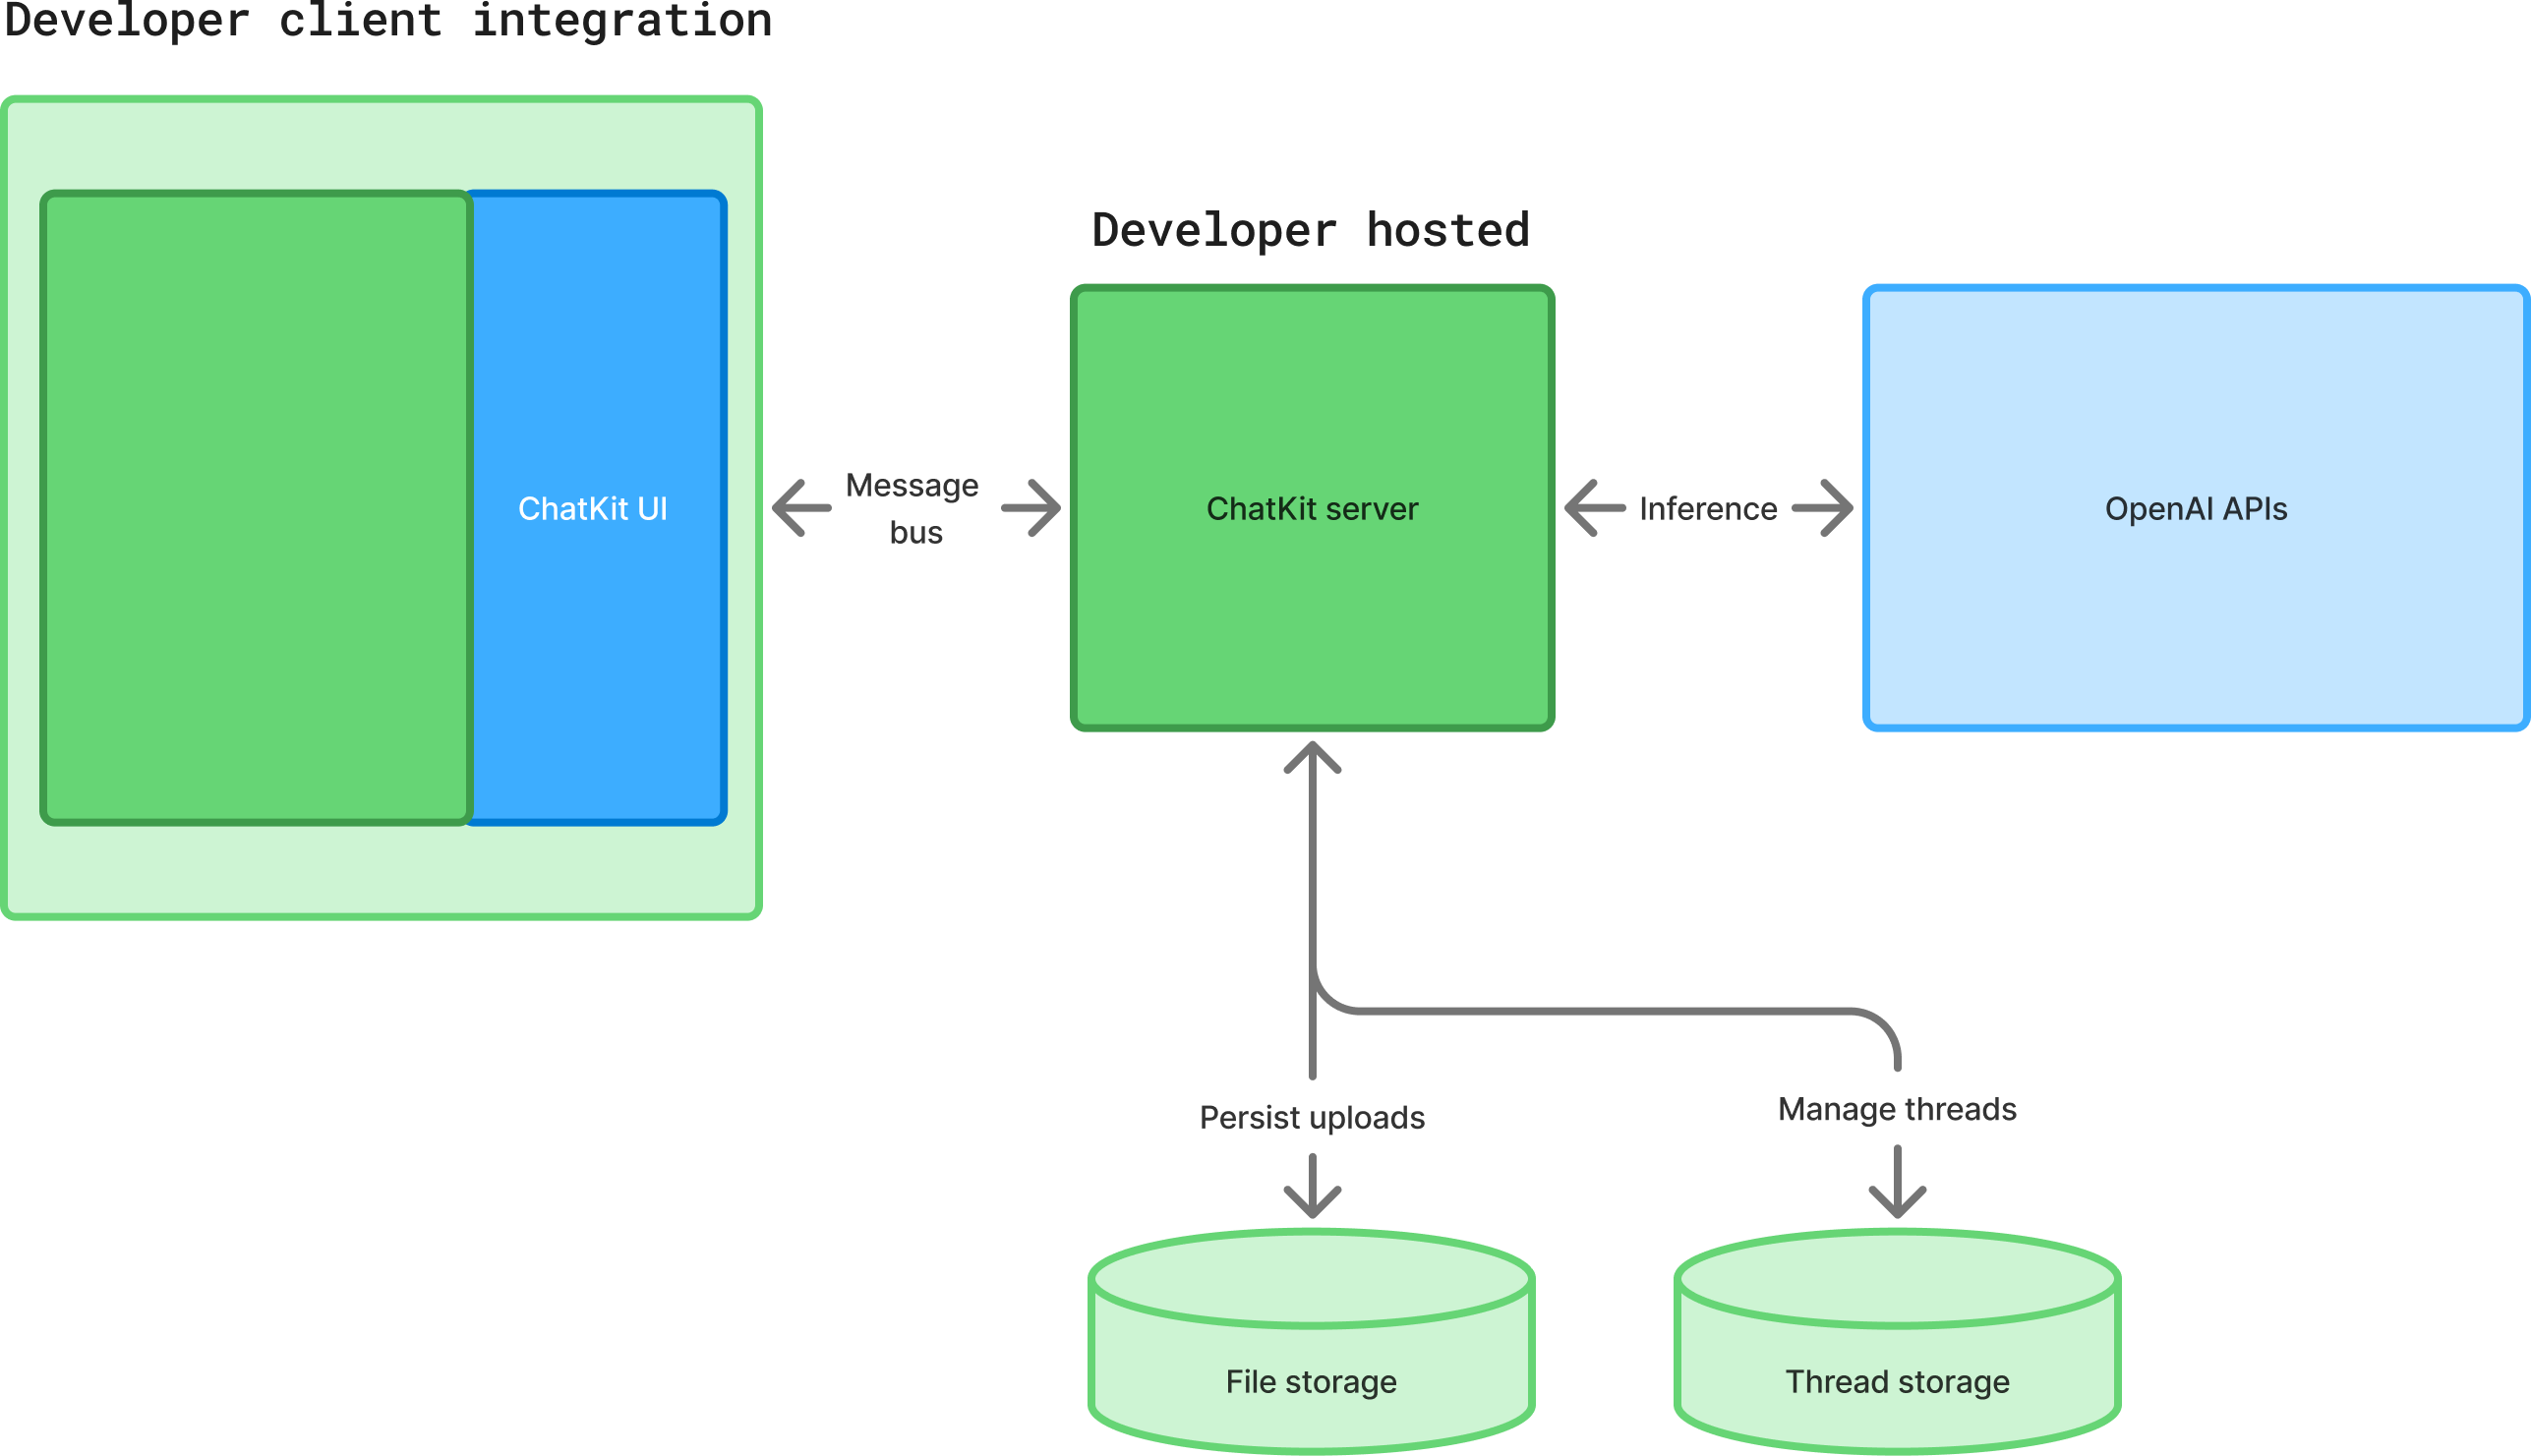
Advanced integrations with ChatKit
==================================
Use your own infrastructure with ChatKit for more customization.
When you need full control—custom authentication, data residency, on‑prem deployment, or bespoke agent orchestration—you can run ChatKit on your own infrastructure. Use OpenAI's advanced self‑hosted option to use your own server and customized ChatKit.
Our recommended ChatKit integration helps you get started quickly: embed a chat widget, customize its look and feel, let OpenAI host and scale the backend. [Use simpler integration →](/docs/guides/chatkit)
Run ChatKit on your own infrastructure
--------------------------------------
At a high level, an advanced ChatKit integration is a process of building your own ChatKit server and adding widgets to build out your chat surface. You'll use OpenAI APIs and your ChatKit server to build a custom chat powered by OpenAI models.
Set up your ChatKit server
--------------------------
Follow the [server guide on GitHub](https://github.com/openai/chatkit-python/blob/main/docs/server.md) to learn how to handle incoming requests, run tools, and stream results back to the client. The snippets below highlight the main components.
### 1\. Install the server package
```bash
pip install openai-chatkit
```
### 2\. Implement a server class
`ChatKitServer` drives the conversation. Override `respond` to stream events whenever a user message or client tool output arrives. Helpers like `stream_agent_response` make it simple to connect to the Agents SDK.
```python
class MyChatKitServer(ChatKitServer):
def __init__(self, data_store: Store, file_store: FileStore | None = None):
super().__init__(data_store, file_store)
assistant_agent = Agent[AgentContext](
model="gpt-4.1",
name="Assistant",
instructions="You are a helpful assistant",
)
async def respond(
self,
thread: ThreadMetadata,
input: UserMessageItem | ClientToolCallOutputItem,
context: Any,
) -> AsyncIterator[Event]:
agent_context = AgentContext(
thread=thread,
store=self.store,
request_context=context,
)
result = Runner.run_streamed(
self.assistant_agent,
await to_input_item(input, self.to_message_content),
context=agent_context,
)
async for event in stream_agent_response(agent_context, result):
yield event
async def to_message_content(
self, input: FilePart | ImagePart
) -> ResponseInputContentParam:
raise NotImplementedError()
```
### 3\. Expose the endpoint
Use your framework of choice to forward HTTP requests to the server instance. For example, with FastAPI:
```python
app = FastAPI()
data_store = SQLiteStore()
file_store = DiskFileStore(data_store)
server = MyChatKitServer(data_store, file_store)
@app.post("/chatkit")
async def chatkit_endpoint(request: Request):
result = await server.process(await request.body(), {})
if isinstance(result, StreamingResult):
return StreamingResponse(result, media_type="text/event-stream")
return Response(content=result.json, media_type="application/json")
```
### 4\. Establish data store contract
Implement `chatkit.store.Store` to persist threads, messages, and files using your preferred database. The default example uses SQLite for local development. Consider storing the models as JSON blobs so library updates can evolve the schema without migrations.
### 5\. Provide file store contract
Provide a `FileStore` implementation if you support uploads. ChatKit works with direct uploads (the client POSTs the file to your endpoint) or two-phase uploads (the client requests a signed URL, then uploads to cloud storage). Expose previews to support inline thumbnails and handle deletions when threads are removed.
### 6\. Trigger client tools from the server
Client tools must be registered both in the client options and on your agent. Use `ctx.context.client_tool_call` to enqueue a call from an Agents SDK tool.
```python
@function_tool(description_override="Add an item to the user's todo list.")
async def add_to_todo_list(ctx: RunContextWrapper[AgentContext], item: str) -> None:
ctx.context.client_tool_call = ClientToolCall(
name="add_to_todo_list",
arguments={"item": item},
)
assistant_agent = Agent[AgentContext](
model="gpt-4.1",
name="Assistant",
instructions="You are a helpful assistant",
tools=[add_to_todo_list],
tool_use_behavior=StopAtTools(stop_at_tool_names=[add_to_todo_list.name]),
)
```
### 7\. Use thread metadata and state
Use `thread.metadata` to store server-side state such as the previous Responses API run ID or custom labels. Metadata is not exposed to the client but is available in every `respond` call.
### 8\. Get tool status updates
Long-running tools can stream progress to the UI with `ProgressUpdateEvent`. ChatKit replaces the progress event with the next assistant message or widget output.
### 9\. Using server context
Pass a custom context object to `server.process(body, context)` to enforce permissions or propagate user identity through your store and file store implementations.
Add inline interactive widgets
------------------------------
Widgets let agents surface rich UI inside the chat surface. Use them for cards, forms, text blocks, lists, and other layouts. The helper `stream_widget` can render a widget immediately or stream updates as they arrive.
```python
async def respond(
self,
thread: ThreadMetadata,
input: UserMessageItem | ClientToolCallOutputItem,
context: Any,
) -> AsyncIterator[Event]:
widget = Card(
children=[Text(
id="description",
value="Generated summary",
)]
)
async for event in stream_widget(
thread,
widget,
generate_id=lambda item_type: self.store.generate_item_id(item_type, thread, context),
):
yield event
```
ChatKit ships with a wide set of widget nodes (cards, lists, forms, text, buttons, and more). See [widgets guide on GitHub](https://github.com/openai/chatkit-python/blob/main/docs/widgets.md) for all components, props, and streaming guidance.
See the [Widget Builder](https://widgets.chatkit.studio/) to explore and create widgets in an interactive UI.
Use actions
-----------
Actions let the ChatKit UI trigger work without sending a user message. Attach an `ActionConfig` to any widget node that supports it—buttons, selects, and other controls can stream new thread items or update widgets in place. When a widget lives inside a `Form`, ChatKit includes the collected form values in the action payload.
On the server, implement the `action` method on `ChatKitServer` to process the payload and optionally stream additional events. You can also handle actions on the client by setting `handler="client"` and responding in JavaScript before forwarding follow-up work to the server.
See the [actions guide on GitHub](https://github.com/openai/chatkit-python/blob/main/docs/actions.md) for patterns like chaining actions, creating strongly typed payloads, and coordinating client/server handlers.
Resources
---------
Use the following resources and reference to complete your integration.
### Design resources
* Download [OpenAI Sans Variable](https://drive.google.com/file/d/10-dMu1Oknxg3cNPHZOda9a1nEkSwSXE1/view?usp=sharing).
* Duplicate the file and customize components for your product.
### Events reference
ChatKit emits `CustomEvent` instances from the Web Component. The payload shapes are:
```ts
type Events = {
"chatkit.error": CustomEvent<{ error: Error }>;
"chatkit.response.start": CustomEvent<void>;
"chatkit.response.end": CustomEvent<void>;
"chatkit.thread.change": CustomEvent<{ threadId: string | null }>;
"chatkit.log": CustomEvent<{ name: string; data?: Record<string, unknown> }>;
};
```
### Options reference
|Option|Type|Description|Default|
|---|---|---|---|
|apiURL|string|Endpoint that implements the ChatKit server protocol.|required|
|fetch|typeof fetch|Override fetch calls (for custom headers or auth).|window.fetch|
|theme|"light" | "dark"|UI theme.|"light"|
|initialThread|string | null|Thread to open on mount; null shows the new thread view.|null|
|clientTools|Record<string, Function>|Client-executed tools exposed to the model.||
|header|object | boolean|Header configuration or false to hide the header.|true|
|newThreadView|object|Customize greeting text and starter prompts.||
|messages|object|Configure message affordances (feedback, annotations, etc.).||
|composer|object|Control attachments, entity tags, and placeholder text.||
|entities|object|Callbacks for entity lookup, click handling, and previews.||